

This tutrial is written by me using PSP 10 and Animation Shop 3Any similarities to other tutorials is purely coincidental and unintentional.All materials and tubes used are copyright to their respective owners.
Supplies
you find my pumpkins Here
and my pumpkin wordart Here
Licensed artist work is by Rachel Huntington
Plugins used
Mura's Meister - Copies
Eye Candy 4000 - HSB noise
Alien Skin Xenofex 2
Lets begin
Open a new image 600x600 transparent.
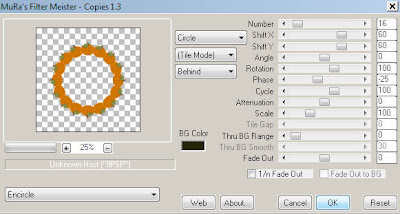
Add the round pumpkin with leaves, resize it to 25%Add Mura's Meister copies with these settings
add a drop shadow (1,1,100,6)
Use the magic wand and select inside the pumpkin circleSelections - modify - expand by 5
Use the magic wand and select inside the pumpkin circleSelections - modify - expand by 5
add a new raster layer below it and flood fill it #fa9f4e Deselect
Duplicate it twice and add Eye Candy 4000 - HSB Noise - Transparent Haze with
these settings to all 3 layersfor the other 2 layers just hit the Random Seed button
 Close 2 of the layers.
 Add your tube of choise and give it a drop shadow.
Add the wordart, resize and give it a drop shadow
(I had to split mine in 2 using the freehand selection tool,
so that I got one part on each side of her leg.)
Duplicate it twice, use the freehand selection tool to just select the pumpkin.
Add Xenofex 2 Constellation Bling Blingwith these settings,
hit the Random Seed button for the 2 other 2 layers
 Close 2 of the layers.
Add your name of choise (I used the font festival flourish)and the proper ©
Crop it if needed
Now we're ready to animate.
Merge visible and copy
Open Animation Shop 3 and paste as new animation.
Merge visible and copy
Open Animation Shop 3 and paste as new animation.
Undo in psp, and open the next wordart and circlefilling layer closing the ones you've used.
Merge visible again and copy.
Merge visible again and copy.
Paste after current in Ani Shop 3.Do the same to the third layers in PSP.
Select all frames and change frame properties to 25.
Select all frames and change frame properties to 25.
And you're done!!
Thanks for trying it out, and hope you've had fun!
Thanks for trying it out, and hope you've had fun!
I'd love to see what you've made of this.
Tutorials are © Tutorials by Vaybs
Tutorials are © Tutorials by Vaybs
No comments:
Post a Comment